
Conversion Tracking with Voluum
How to connect Voluum to Adexium so conversions come back to us via S2S postback. Postback endpoint, full parameter list, response codes and the postback key are described in S2S Tracker Basics — this page covers only the Voluum-specific steps.
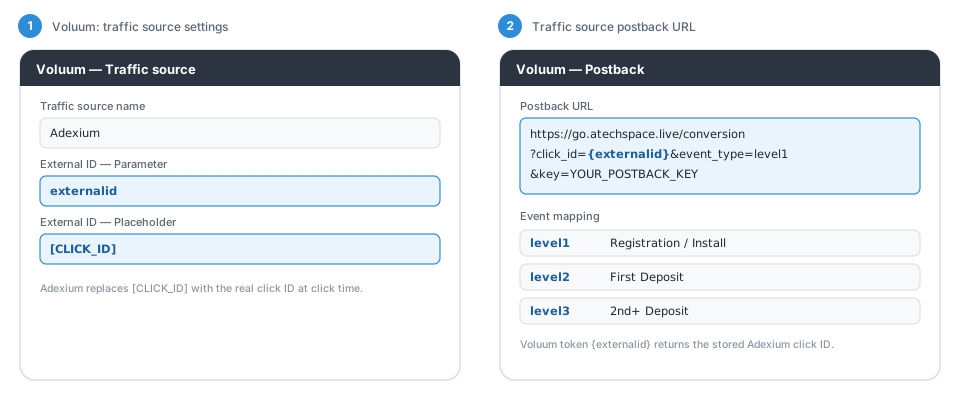
The illustration below is schematic: field names match Voluum's settings, but the visual layout is simplified.
1. Traffic Source in Voluum
In Voluum go to Traffic Sources → New traffic source and create a custom source named "Adexium". In the External ID section set the parameter name to externalid and the placeholder to [CLICK_ID].
2. Traffic Source Postback URL
In the same traffic source form, paste our postback URL and use Voluum's {externalid} token in place of the click ID:
https://go.atechspace.live/conversion?click_id={externalid}&event_type=level1&key=YOUR_POSTBACK_KEYFor deposits, send the same URL with event_type=level2 / event_type=level3 (Voluum can route custom conversion types to different postbacks). Optionally append &payout={payout}.
3. Campaign URL in Adexium
Create a campaign in Voluum with this traffic source and copy the campaign URL into your Adexium campaign. It must carry our macro:
https://YOUR-VOLUUM-DOMAIN.com/PATH?externalid=[CLICK_ID]Voluum stores our click ID as externalid and returns it in the postback automatically.
Event Mapping
| Event | Meaning |
|---|---|
level1 | Registration / Install |
level2 | First Deposit |
level3 | 2nd+ Deposit |
Verify
- Open the campaign URL preview in Voluum and check that
[CLICK_ID]is present verbatim — the macro is replaced by Adexium at click time, not by the tracker. - Send a test click, take the real click ID from Voluum's click log and fire the postback manually in a browser. You should get
{"message":"Accepted"}. - Check the Tracking page in the Adexium dashboard — the conversion appears in campaign statistics within a few minutes.
Questions — contact us via the support bot.